

")


In 2020, creating a Photography Facebook Business Page is one of the best decisions you can make for your business.
What’s a Photography Facebook Business Page?
A Facebook Business Page is a free separate profile and marketing tool created for businesses. It allows business owners to connect and engage with current and prospective clients.
You’re probably thinking, “Ok but what are the ultimate benefits of creating one?”
Let me list them out for you:
- Creating a Facebook Business Page allows people to learn about your business, the services you offer, how you can be contacted, and where you are located.
- Every Facebook Business Page affords the option to add your businesses location, including hours of operation, and your phone number.
- Interested clients can chat with you through the Facebook Business Page, creating a simple avenue for communication.
- Facebook Business Pages are a great way to organically reach people through likes, comments, and shares. The more activity and exposure on your page, the higher the organic reach. Get it?!
- At the top of every Facebook Business Page is a call-to-action that can be presented a few different ways. For example, ‘Click for more information’ or ‘Learn more.’ Having a call-to-action generates leads.
- After creating a Facebook Business Page you can increase your visibility by creating Facebook ads. Facebook ads provide your audience with all relevant business information and can produce real results!
I know this might seem overwhelming, but don’t fret! A solid Facebook Business Page can be successfully created in just 15 minutes or less!
Oh, and here’s some motivation:
There are 2.4 BILLION active monthly users on Facebook.
Yep, that’s right. About 32% of the planet logs on every single day. So what does this mean for your business?
It means that if you want to do business online, having a strong presence on Facebook is a really good idea.
This guide walks you through everything you need to know to get your Facebook Business Page up and running like a pro.
Step #1: Sign Up.
This is the first step to creating any page or profile online. Facebook is no different. In fact, they make this process extremely easy for you.
To start, go to facebook.com/business and click ‘Create’ in the top right-hand corner.
Then, click ‘Page.’
Facebook then provides you with two options:
- Business or brand.
- Community or public figure.
Since we are creating a Facebook Page for your business, click ‘Get Started’ under the ‘Business or Brand’ box.
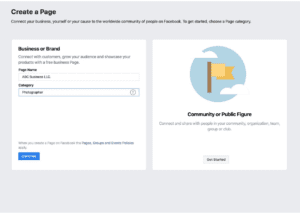
Click ‘Continue’.
Next, you’ll notice that the page is pretty bare.
No one likes to be underdressed.
This brings us to Step 2.
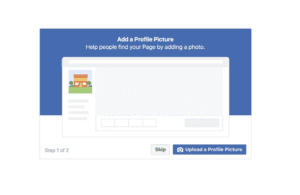
Step #2: Add Pictures.
It’s best to have your page built out with as much content as possible. This includes a cover and profile photo, which makes your page more inviting and engaging to users.
You can dress up your page by uploading those cover and profile images, making sure that the photos you choose are easily identifiable and relevant to your business.
What we recommend:
- Profile photo: Ideally, it’s a good idea to upload your company logo as the Facebook Business Page profile photo since this photo will appear as your icon every time you post, publish or comment.
The ideal size for a Facebook profile photo is 170 pixels wide by 170 pixels tall.
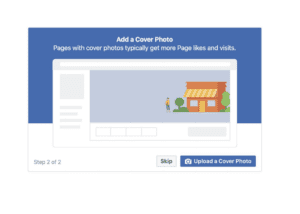
- Cover photo: The cover photo appears across the top of the page and is a great opportunity to add a strong visual element to your page that supports your personal branding, and intrigues visitors to learn more.
The ideal size for a Facebook cover photo is 820 pixels wide by 462 pixels tall.
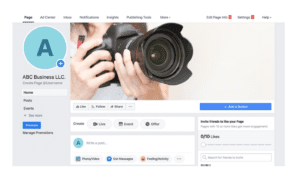
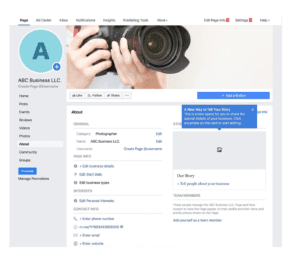
Step #3: Explore your new photography business page.
Now that you’ve uploaded images, your page is officially live and ready to be built!
Feel free to click around and take a quick walk-through of the Page to get acquainted. Or if you’d rather, you can click on “See All Page Tips.” This pop-up provides steps on how to make your Business Facebook Page more successful! Either option only takes a few seconds.
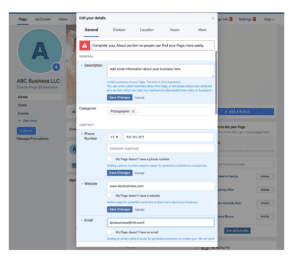
Step #4: Add a short description and fill out your complete business information.
Click the three dots to the right of the ‘Share’ button then click ‘Edit Page Info.” Simply share what you think people need to know. Then fill out the rest of the fields.
Click ‘Save’ when you are done.
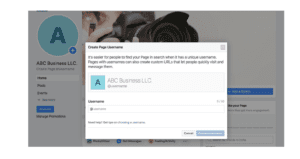
Step #5: Create your username.
Your username tells people where to find you on Facebook and can be up to 50 characters long.
Tip: You want your username to be easy to type and remember. Your business name is always the best choice. Remember, your username will be used in all of your Facebook interactions, and it’s what people will use when they tag your Page in posts and images, so keep it professional.
To create your username, click ‘Create Page @Username.’ Type in your desired username and click ‘Create Username.”
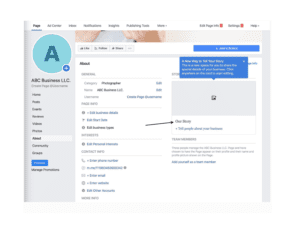
Step #6: Complete your “About” section.
It’s very important to fill out all of the fields in your Facebook Page’s About section. If someone is looking for a photography business that is open on Sundays, but can’t find this information on your Page, they’ll keep looking until they find another business that is available!
Here’s the minimum we recommend filling out on your Page:
-
- Description: Let people know what your Business Page is about in 155 characters.
- Categories: Categories can help people find your Business Page. Choose up to three categories.
- Location: Share your address so people know where you provide services and how they can locate you.
- Hours: State your hours of operation so people know when they can get in touch with you.
- Contact Information: Add your business phone number, website URL, and email address here.
- Price Range: Tell people what to expect price wise for your services.
All of these details will appear on the ‘About’ section of your Business Facebook Page. Feel free to fill out more than what we recommended for ultimate Page success. For example, you could add any awards your business won, or other social media accounts you have for your business.
To get started, click ‘About’ on the left-hand side of your Facebook Page.
From here, you can go in and fill out the fields we mentioned above and more.
This is also where you can add a longer description of your business. Simply click ‘Our Story’ on the right side of the Page to provide a more detailed description of what your business offers and why they should like or follow your Page. Click ‘Save’ when you are finished.
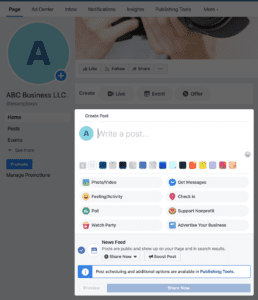
Step #7: Create your first post.
Before you start inviting people to like the Facebook Page for your business, you’ll want to make sure you share some valuable content for them to view. This is your time to get creative!
You can also create more specific types of posts. For example, product offers. We recommend being consistent with posting to keep Page engagement up. For example, you could post a photo, video, an event, milestone, or simply a status update. Of course, remember to keep it professional. This is the face of your business.
To create your very first post, click the three dots to the left of the ‘Feeling/Activity’ and select what type of content you’d like to share.
Get creative, be yourself, and remember to always respond to comments and messages to cultivate relationships!
Step #8: Start engaging.
Congrats! Your Facebook Business Page is up and ready to deliver amazing content to customers.
Before we set you free, here’s a quick guide to the different Page sections you can see at the top of your Facebook Business Page.
- Page: This is the link that takes you back to where you are now.
- Inbox: This is where you can interact with other users through the Page.
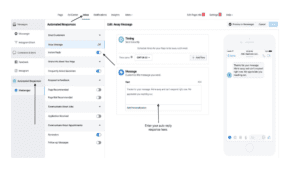
Tip: You can enable auto reply, a built-in option that allows you to create predefined messages which can be sent as an auto reply whenever someone sends a message to your Business Facebook Page, for your Page inbox. The number of messages you receive wont pile up this way. Create a welcome message with information about your business. This provides a way for people to get some information about your business without having to wait for your response.
To set up auto reply, click ‘Inbox’ at the top of your Page > click ‘Automated Responses’ in the left column > then click next to ‘Instant Reply’ below Greet Customers to turn instant reply on > to change your instant reply message, click Edit Message in the middle. Click ‘Save’ in the top right to update the message.
- Notifications: Clicking this will show you a summary of your Page’s interactions.
- Insights: This is where you can track your Page metrics.
- Publishing Tools: This is where you can schedule new posts and review past performance.
- Promotions: You can manage and track your Facebook Ad campaigns here.
Now that you’ve got the gist of how the Page works, feel free to invite family and friends to like the Page.
Tip: You can also link the Business Facebook page within your email automations and main business website to gain traffic.
To ensure you are providing the correct link, you will want to use your Facebook Business Page username as the URL slug. For example, if your Page username is @examplexyz, you would use the following URL within your automations for correct linking: https://www.facebook.com/examplexyz
At this point, you’re a Facebook Business Page pro! Time to sit back and watch your business grow into something wonderful.
Humberto Garcia is one of the world’s leading photography business growth expert.
Founder of Photography to Profits and high-performance coach to multiple 6-figure photography businesses. Humberto coaches photographers from his special operations military experience and photography sales and marketing experience. After years of high performance in Marine Special Operations and building businesses, he knows what works.


Very informative. Easy to follow, and understand. Thank you for your insight and valuable information.
My website is going live in a few days, and adding the FB page prior will be great